Git
![]()
What is Git?
- Most widely used version control technology in the world
- Created by Linus Thorvalds (creator of Linux, Android …)
- Free and open-source
- Works best for text files, but can be used for other file types
Git repositories
- A project is tracked as a Git repository
- Tracking occurs via a hidden subdirectory called
.git/inside the root directory - A Git repository looks like any other directory on your system (except for the presence of
.git/)
Common ways to create Git repositories
-
Start tracking an existing local project by turning it into a Git repository
-
clonea remote Git repository and start tracking it locally
A common place to host remote Git repositories is GitHub.
What is GitHub?
Most people hear about GitHub before Git, so let’s cover that briefly:
-
GitHub is a website that hosts Git repositories
-
Provides modern looking interface with many features for collaboration
- GitHub started as a community maintained project and was so for many years
-
Acquired by Microsoft in 2018
-
Free for basic usage
- Largest open-source platform in the world (incl. Python)
Some things GitHub makes easy
- Viewing version history of projects tracked by Git
- Collaborating on projects for both small and very large teams
- Showcasing projects and demonstrating their use
- Managing projects with to-do’s, issues, milestones, releases etc.
To understand GitHub, one must first have a basic understanding of Git and version control in general.
Let’s move on with that :rocket:
So again, what is Git?
-
A distributed version control system
-
Which means: Everyone has a local
cloneof the entire project and its history

Advantages of Git
- Fast and light-weight
- Seamless collaborative work (no check-in/out locks)
- Work alone when needed and share when needed
- Almost impossible to lose work
- Support workflows from very simple to very complex
Git Basics
Git commands
Interaction with Git is performed via commands in Git Bash
- Opens from inside your Git repository via right-click menu
- Interact with the repository by typing
git <command_name> - Many editors support common commands in GUI form
Initialize a Git repository inside a directory by typing
git init
This will create the hidden .git folder in the current directory.
Commit
The git commit command is the heart of Git.
Git does the following when git commit is executed:
-
Saves your local staged changes to your local Git repository
-
Takes a “picture” of what the repository files look like and stores it as a snapshot
-
Gives the snapshot an ID so all files can be reverted to that state at any time
-
Assigns the commit message you specify to snapshot
Make a commit each time you want to record a snapshot of the project state by:
git commit -m "Commit message goes here"
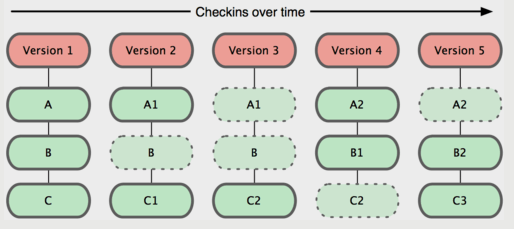
Commits over time
A commit records the state of all files, even unchanged ones.
Git uses pointers instead of duplicating unchanged files.
Status of files
A file in a Git repository can have two states:
- Untracked Grey operations
- Tracked Red operations
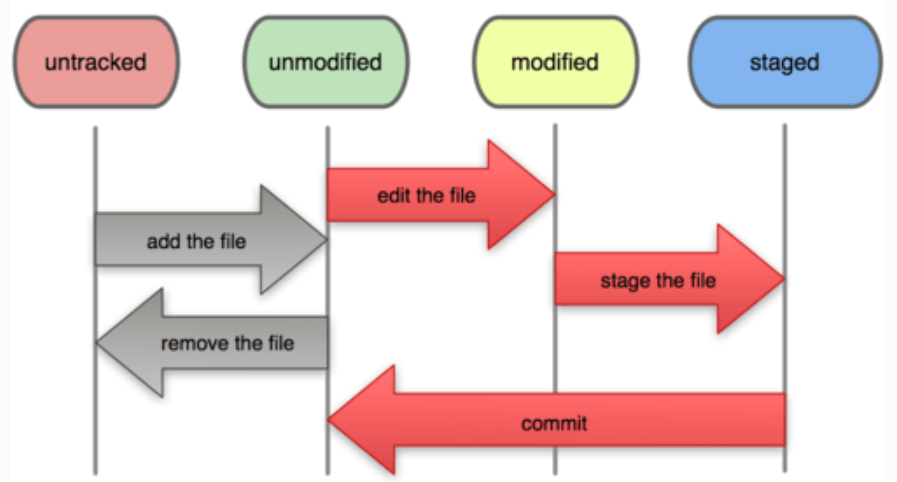
Three local states
A file that is tracked inside a Git repository can be in three states:
1. Modified: File is modified and Git has detected it
2. Staged
File is in the staging area ready to be included in the next commit
3. Committed The file has been checked in and Git has taken a snapshot of the repository state

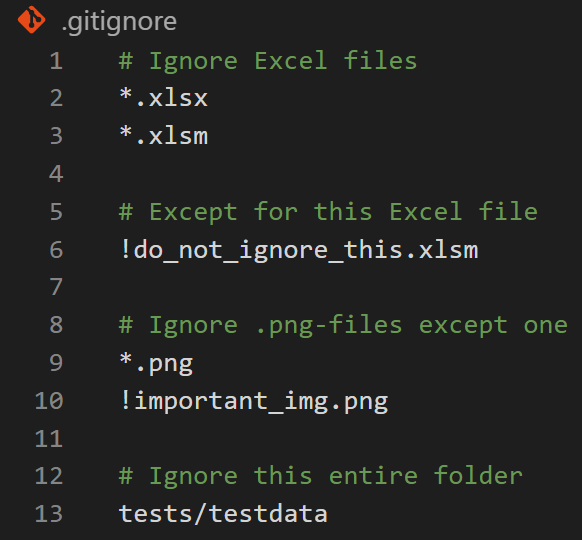
Ignoring files
It’s quite common to have things inside a Git repository that you do not want to have version controlled.
The .gitignore file inside the repository controls what is being version controlled.
-
Examples of files to ignore:
- Excel files
- Pictures or graphs
- Dummy data sets for testing
- Generated files
Branching
Branching illustrated 1/4
Branching is best explained by an example.
Scenario:
- We have a main branch called
master - We just made a
commitC1 which made the code stable and ready for use by others.
The figure to the right depicts the scenario.
Note:
HEADis a reference to the currently checked out commit

Branching illustrated 2/4
We want to keep developing and create a new feature.
But we don’t want to work directly in master. Others are using this branch and developing might temporarily bring it into a broken state.
- So we create a new branch called
featurefrom Git Bash by typing
git branch feature

Branching illustrated 3/4
We have created the branch, but the currently checked out commit (HEAD) is still master’s C1.
- We switch to the new
featurebranch by
git checkout feature
This switched us to the new feature branch with the same commit C1

Branching illustrated 4/4
Now we want to start making the changes to implement our feature.
- We make changes over two commits via
git commit
This creates commits C2 and C3.
C2 and C3 might have made master unstable had it been done on that branch. But we are safe to experiment on our feature branch.

Merging
Merging the feature branch
Continuing from the previous branching example.
Our work on branch feature has been completed by commit C3. We want to merge it back into master so other can use it.
We’ll cover three different merging scenarios:
-
Automatic merge: Fast-forward Branch
featurehas commits beyond C1, butmasteris unchanged at commit C1 -
Automatic merge: 3-way merge Both
featureandmasterhas new commits beyond C1 which are not conflicting -
Merge conflict Both
featureandmasterhas new commits beyond C1 which are conflicting
Auto merge: Fast-forward
We can seamlessly merge branch feature into branch master by simply moving C2 and C3 to master.
This is because mater is unchanged since branch feature was created. The history is linear.
git checkout master
git merge feature
Note: When doing
git merge <branch_name>,HEADmust be in the branch tomergeinto.

Auto merge: 3-way merge
Branch master now has a commit C3 after feature was created. Thus, both C2 and C3 has to be taken into account when merging.
If C2 and C3 has no competing changes, Git is smart enough to perform an automatic merge by use of those two commits and their common ancestor C1 (3-way).
git checkout master
git merge feature

Merge conflict
Suppose the commits C3 and C4 has conflicting changes.
There’s no way for Git to know which change to keep during merge.
Thus, the user must
- resolve the
merge conflictmanually committhe changesmergeagain
Merge conflicts can be resolved in the editor.

Summary: Branching
-
Allows us to avoid working on the
masterbranch -
Everybody can work without overwriting work of others
-
Work can be grouped logically into a branch for each sub project
-
Use branches for work that’s experimental in nature (and might end up discarded)
-
A branch creates a pointer to a commit ID (not a copy of the file system)
-
Creating a branch is cheap —> it’s encouraged to do it often
-
Main branch is by default called
master:exclamation:
Summary: Merging
-
Allows us to feed work from branches back into the
master(or other branches) -
Frees us from a lot of manual and error prone work
-
Provides a natural step for QA (more on this when we get to GitHub)
-
A successful
mergecreates a new merge commit at the tip of the current branch -
After merging, the branch that was merged in can be deleted
-
Basic merging can have three outcomes: 1. Fast-forward, 3-way merge or merge conflict
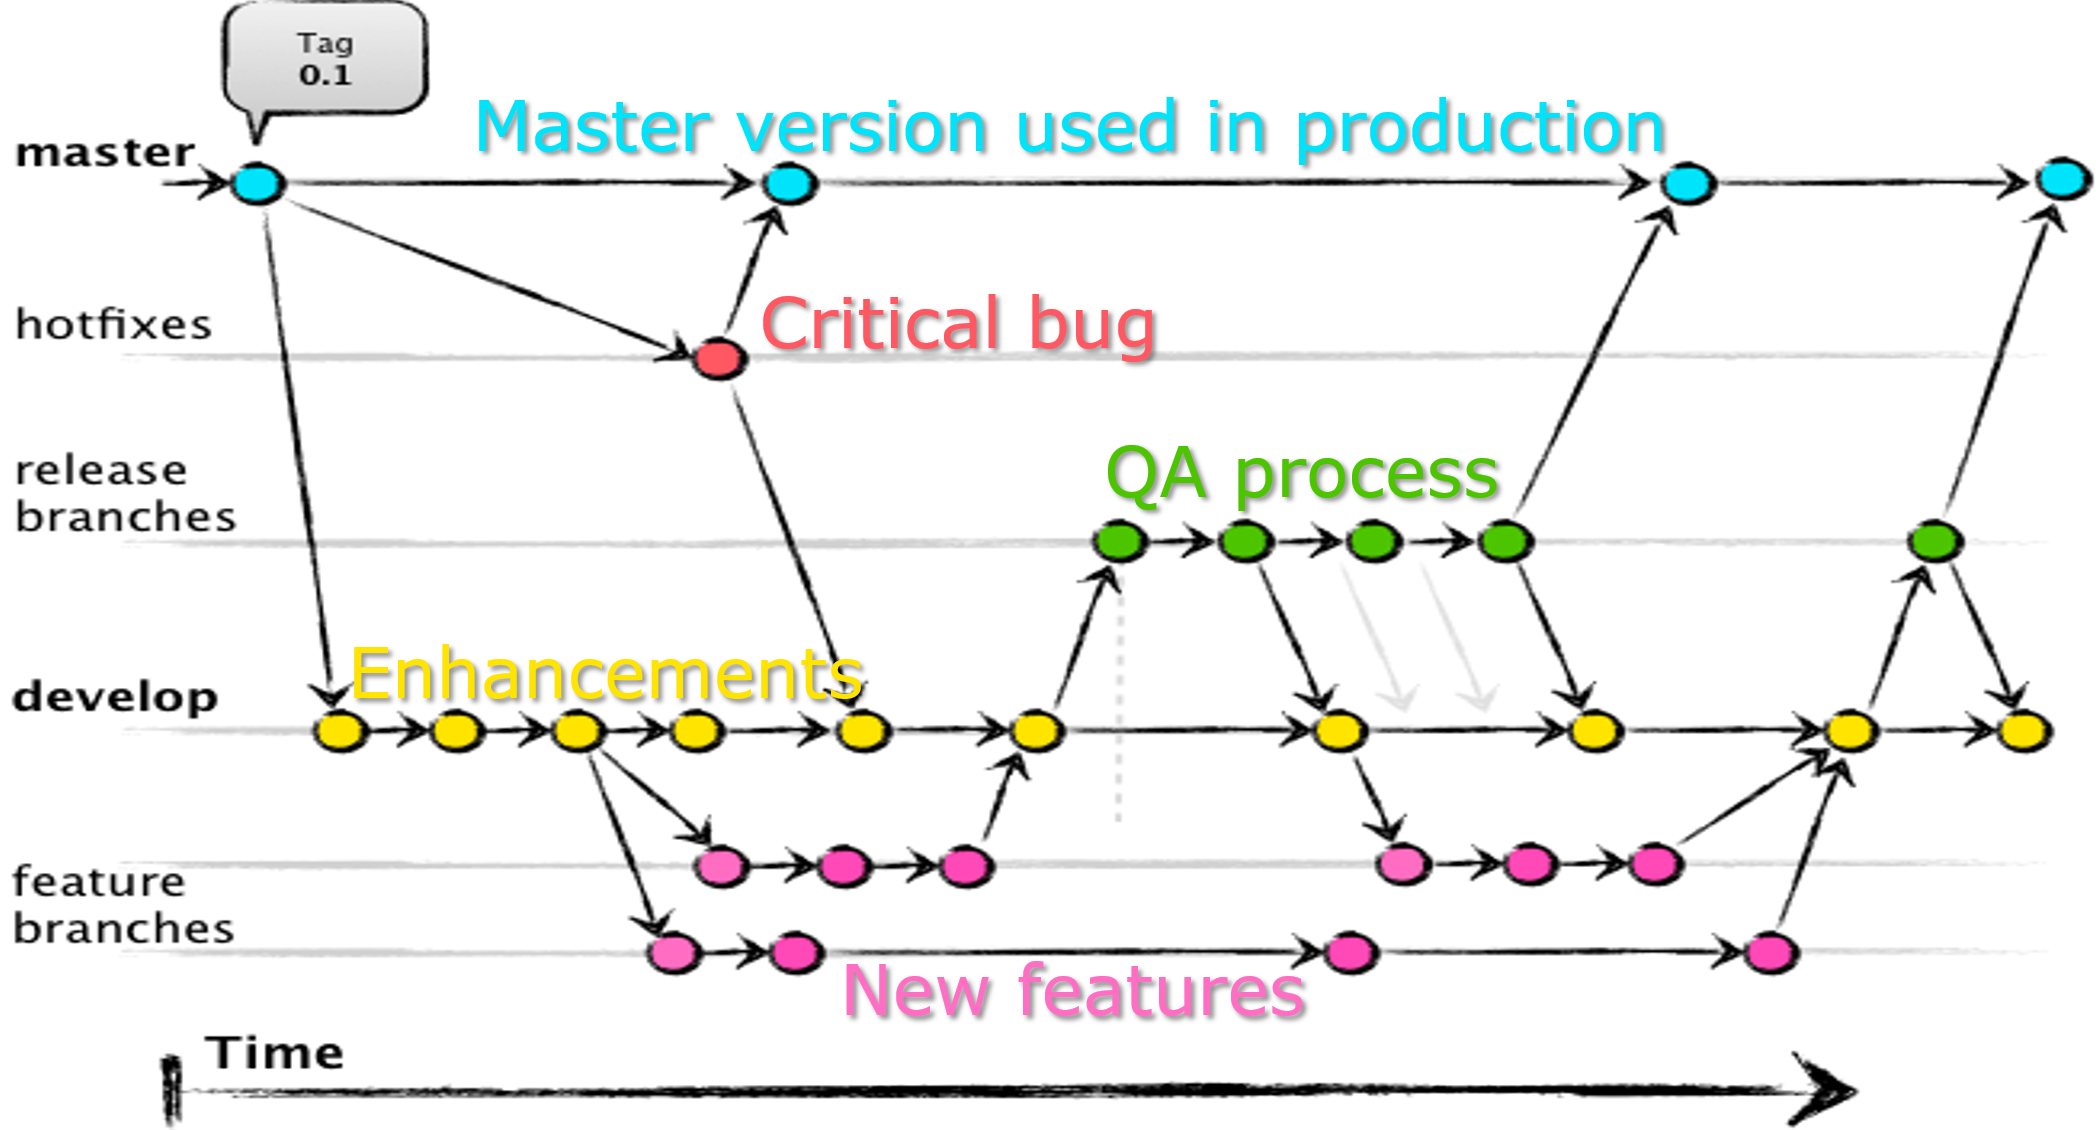
Workflow
Simple workflow example

Advanced workflow example (often referred to as Git Flow)
Git in VS Code
Git interface - Git Bash vs. an editor
Git Bash (the command line interface) is the original way of working with Git. It contains all the available commands and gives the user more control.
However, all the popular editors have Git integration build in, which includes the vast majority of functionality for basic users. It’s arguably an easier way to get into the workflow for beginners.
Visual Studio Code has great Git integration!
Start tracking your own project
You want to create a new project and start tracking it with Git and GitHub. We can initialize a repository as shown below.
Git Bash command:
git init
From VS Code the same operation looks like this:
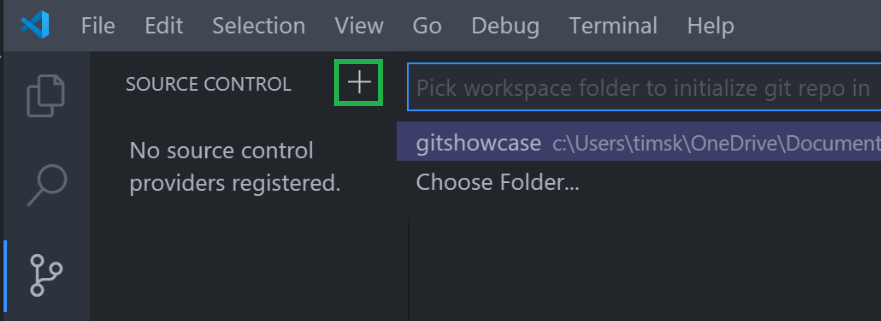
VS Code - Source control tab
Git for non-text files
Binary files
-
Non-text files are so-called binary files in Git’s eyes.
-
They can not be meaningfully compared from commit to commit.
This creates a problem for merging, since the merging algorithm needs to compare the tip commit on the two branches to be merged with their common ancestor commit. When the difference between the commits can’t be determined, merging always results in a conflict. You need to retain one branch or the other.
Merging of binary files
-
Image with two different commits (non-conflicting) each on their own branch
-
Easy for humans to visually see how to merge
-
File cannot be textually merged
-
User must choose one or the other to keep and discard the other
-
Excel, word and PowerPoint files are also binary

Summary
Git can version control binary files, but it has some limitations.
- Git cannot create meaningful diffs of binary files, which makes it hard to view changes from one commit to the next.
- As a consequence, Git cannot automatically merge two diverged branches, i.e. two branches that were both committed to after they split. In that case it must be manually chosen which branch is the right one to continue with.
Basic commands
| Command | Description |
|---|---|
git init |
Initialize an empty Git repository in the current working directory (create hidden .git folder) |
git clone <url_to_remote_repo> |
Clone an existing remote repository to your machine (E.g. from GitHub) |
git add filename |
Adds filename to staging area ready to be committed. Add all files by git add . |
git commit -m "First commit" |
Choose custom commit message if desired |
git status |
Show the current status of the repository (untracked, modified and staged files) |
git branch branch_name |
Create a branch called branch_name |
git checkout branch_name |
Checkout (or switch to) the branch called branch_name |
git checkout -b branch_name |
Create and checkout (or switch to) the branch called branch_name |
git branch |
List all branches (shows an asterisk * at the currently checked out branch |
git merge branch_name |
Merge the branch called branch_name into the currently checked out branch |
touch filename.ext |
Create a file filename with extension ext in current directory. Files can of course also be created by other methods or copied form elsewhere. Note: This is not actually a Git, but a Linux command |
References
| Link | Description |
|---|---|
| Resources to learn Git | GitHub guides for Git |
| GitHub For Beginners: Don’t Get Scared, Get Started | Article on Git and GitHub (nicely explained) |
| Pro Git | Book on Git written by experts |
.gitignore examples |
Good examples of .gitignore files for various languages |
Exercises
Purpose
The idea for the rest of the course is to integrate Git into all the subsequent sessions. We’ll use Git for version controlling our code when solving the exercises.
By the end of the course we should be pretty familiar with how Git works and feel comfortable using it going forward.
If you haven’t installed Git yet you can do so from here.
Exercise 1 - One time configurations
Open Git Bash and check out your settings by git config --list.
If needed, setup your global user name and email by typing the commands below.
git config --global user.name "John Doe"
git config --global user.email johndoe@cowi.com
This user information will be tied to all commit actions that you do later on.
Exercise 2
Create a new directory to store the contents you produce for this course. Inside that folder in Windows explorer, right-click and select Git Bash here.
Initialize an empty Git repository inside this directory by
git init
You can also do this from VS Code, as shown in the previously, if you want.
Recall that initializing a repository creates a hidden directory called .git, which will store all metadata about the project’s version history.
Exercise 3
You probably want to store some files in the Git repository that you don’t want to version control.
Create a .gitignore file by typing
touch .gitignore
Leave it empty for now.
Exercise 4
Markdown is a way to create simple and good looking text documents. It’s often used for introducing projects in a README.md file, which is shown on GitHub.
Create a markdown file README.md in the root directory. Leave it empty for now.
You can either create the file by the touch command or manually, e.g. via the editor.
Exercise 5
Now you have created two files and modified them, and Git has spotted this.
VS Code view
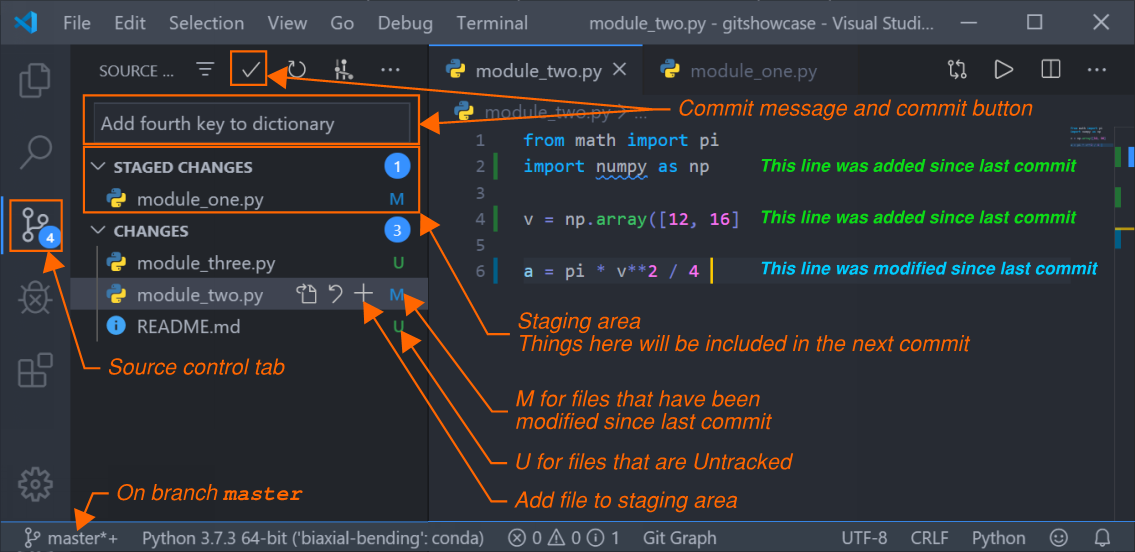
If you are using VS Code, check the Source Control tab on the left pane. The CHANGES tab will reveal all modified files that are not ignored via .gitignore.
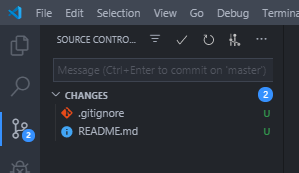
However, the files are not yet under version control. The green U denotes that the files are untracked. They need to be explicitly added to Git.
Git Bash view
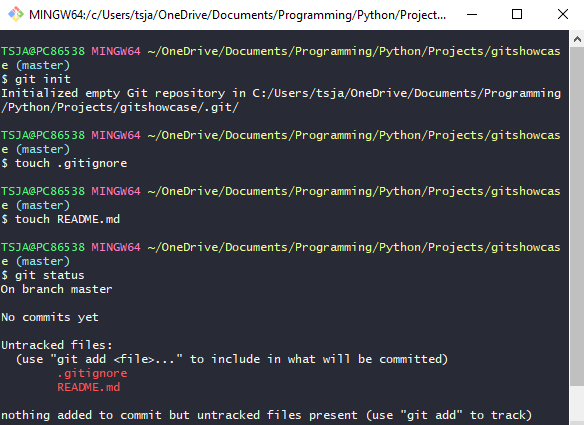
If you are using Git Bash, you can get the same information by typing
git status
See the entire history of what we did so far in the image.
Stage the files README.md and .gitignore to get them ready to go into the next commit.
- You click the
+button in VS Code toaddfiles to the staging area (hoover the mouse over the specific files) - Equivalent commands in Git Bash is
git add README.md .gitignore
You can also stage all files by
git add .
Exercise 6
Now the new files are in the staging area ready to be committed.
Write a message and commit it:
git commit -m "First commit"
In VS Code, this is done by writing the message in the box at the top left of the Source Control tab and pressing the check mark sign to commit it.
Recall that a commit creates a snapshot of the state of the repository. It locks in the changes. This points can be reverted to or branched out from at any time.
Exercise 7
Open the .gitignore file and put the files and folders you want Git to ignore inside it. Use the example file shown previously about ignoring files as basis.
If you are using VS Code you should see the Source Control tab update to .gitignore to now be modified since last commit.
When you are satisfied with the .gitignore file, stage the changes and commit the file with a fitting message.
Exercise 8
All previous exercises have been dealing with the master branch. When git init is executed, the repo starts out with only that branch.
Create a branch called readme
git branch readme
And switch from the master branch to the readme branch
git checkout readme
Note 1: These steps can be done in one go by
git checkout -b readmeNote 2: You can also do this directly from VS Code from the bottom left corner where the current branch is shown
Exercise 9
In VS Code you can see that the current branch changed to readme. In Git Bash you can get the same info by running git branch.
Open the markdown file README.md and write something in it.
A README is often used in repositories on GitHub to explain what the repository is and how it can be used. You could put a text that explains the purpose of your repository.
See a guide for writing markdown here.
When you reach a state you want to record, stage the changes and commit with a message.
Make as many commits as you desire. Keep commits in logical chunks and write concise and clear messages.
Exercise 10
You have now done a number of commits on the readme branch. Suppose you are done working with it for now. It’s time to merge the changes into master.
Recall that merging has to be done from the branch that is to be merged into.
Checkout the master branch
git checkout master
And merge the readme branch into it
git merge readme
Question: What kind of merge operation will be applied in this scenario?
Check how README.md looks in master now. The changes you did in the readme branch should now be part of master.
Since the merge is complete and master now contains all work in readme, it’s safe to delete the readme branch. You can do so by git branch -d readme.
Recap - Diagram of exercise flow
The following tries to depict the workflow of solving the above exercises.
Commands are written for reference.
The diagrams represent the situation after the commands are executed.
Commit messages are written next to each commit.
The diagrams starts from Exercise 6, as that is where the first commit happens.
Exercise 6 - diagram
git commit -m "First commit"

Exercise 7 - diagram
git commit -m
"Add files to gitignore"

Exercise 8 - diagram
git branch readme
git checkout readme
Alternatively in a single command
git checkout -b readme

Exercise 9 - diagram
git commit -m
"Add title and
short description"
git commit -m
"Add description
for Session 0"
git commit -m
"Add location and dates
for course to intro text"

Exercise 10 - diagram
Switch to master to merge into it
git checkout master
git merge readme
Fast-forward merge as branches have not diverged.

Exercise 10 - diagram (cont.)
Alternative merge without fast-forward
git merge --no-ff readme
Creates a new merge commit on master.
